
Hello everyone! Today I am excited to be here to celebrate the release of a brand new Simon Says Stamp STAMPtember® Exclusive Tim Holtz set.

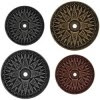
Here are the images in the set.

It is a blueprint set with a great mix of images, combined with wonderful sentiments. I really like these sentiments and they can be used for a large number of occasions.

At first, I was planning to make a card, but then I couldn't make up my mind about which stamp to use, so instead I made a layout. I also though the sentiments worked well on a sweet layout to my baby boy, using one of the first photos of us two together. The blueprint stamps are so fun to watercolour, and I have quite a few projects doing just that. This time, I did a double resist technique with Ranger's Distress Micro Glaze, which is a favourite product of mine. I keep reaching for it, trying out different things. This is a tutorial. You can of course use the techniques for cardmaking, art journaling etc too.

Start by stamping the images on the rough side of Ranger's watercolour paper with Jet Black ink. The only one that I didn't use was the party had one. The papers were cut to 4 x 4 inches.

Apply Distress Micro Glaze sparingly with your finger, to the sentiments, parts of the images you want to preserve white and around the edges.

Smear Distress Inks on a craft sheet, mist with water and colour the images with a paint brush. The glaze will resist the ink.


And some stamping too of course, for texture.

The panels were stitched to the background with black thread.

I embellished the layout with idea-ology pieces and more stamping. The label was stamped with Cracked Pistachio and the sentiment with Potting Soil.

Words were die cut from black cardstock with the Handwritten Love set. The Sizzix Precision Base Plate works great together with these detailed dies. Use this sandwich: Sizzix Multipurpose Platform Tab 2, Precision Base Plate with the text facing down, paper, die facing down, Cutting Pad.

I die cut two hearts from mat board and inked with Twisted Citron and Cracked Pistachio. They were stamped and stapled together and I added our names with Label Letters.

The title of the layout is stamped in an Ornate Frame, which was first distressed with paint. I used only a part of a larger stamp, from the Purely Random set, inking it with Distress Markers. Cracked Pistachio for the sun and Black Soot for the word.

This is such a great sentiment paired up with a camera image.

I added a game spinner to the clock.


Don't miss having a look at all the wonderful inspiration posted with this new STAMPtember® Exclusive Tim Holtz set. The stamp set is a STAMPtember® 2015 Limited Edition that will only be available for sale at Simon Says Stamp until midnight EST STAMPtember 30 *while supplies last. Please remember, it is while supplies last only, and will not be for sale after September 30, 2015.
Happy crafting and have a lovely weekend!
Anna-Karin
Supplies:


This is amazing in so many ways! Now I need Distress Glaze!
ReplyDeleteThis is one of the best places I have found on a blog hop in a long time. You have a new follower
ReplyDeleteThank you so much Diana! And welcome!
DeleteAmazing project with new Tim Holts products..Thanks for sharing and inspiration!!
ReplyDeleteI love this blue print stamps ! And the way you have used them on your page is Amazing..lovely colors ,thanks for sharing the steps.
ReplyDeleteWOW!! what an absolutely GORGEOUS LO Anna;Karin! the photo is beautiful and I love how you used ALL the stamps! You are such a fabulous inspiration! LOVE it :-)
ReplyDeleteluv
Lols x x x
Thank you so much Lols!
DeleteAwesome layout!!! Great stamps and I love the Distress Glaze technique!
ReplyDeletelove your layout Anna-Karin. You always have such a clever idea to make stamps shine!
ReplyDeletethanks for explaining how you used the micro glaze.
ReplyDeleteAmazing page. Glad to hear how to use the glaze.
ReplyDeleteAmazing page. Glad to hear how to use the glaze.
ReplyDeleteVery nice indeed. Enjoyed reading your technique for using the glaze. I think I have to get some.
ReplyDeleteWow, wow, WOW, this is uhhhhmazing, Anna-Karin! Bravo!
ReplyDeleteSuch a sweet and beautiful page! Love the photo, and you have done justice to it with the stamping and color combos. And the stenciling behind is so effective. Always learn something here, thank you.
ReplyDeleteThank you so much Marci!
DeleteLove the yummy lime background!
ReplyDeleteWow, beautiful work!!
ReplyDeleteLove your tutorial and the final results are amazing. Thank you for sharing:)
ReplyDeleteAn amazing layout. Great use of the stamps and so much texture on this page. Great design. TFS
ReplyDeleteGreat tutorial, now I how to use the distress glaze, thanks. Wonderful project.
ReplyDeleteReally Fabulous LO!
ReplyDeleteWhat a FUN layout ... oh my ... THOSE COLORS ... ( gotta try that color palette) ! Okay ... gonna have to break my punishment ... seeing splotches stencil I NEED IT :)
ReplyDeleteGreat tutorial !
Thank you so much Rea! I love stencils with dots, and that Splotches one is wonderful.
DeleteSuch a wonderfully made layout! Love it :)
ReplyDeleteThis is amazing and I love the idea of stitching them together. Thanks for sharing.
ReplyDeleteLinda D.
lovely work, how old is that archival ink pad? wowza ;-)
ReplyDeleteThank you Maaike! That archival ink pad is pretty old! I've been using it daily for quite a few years. It lasts for ever, all I do is to reink it now an then.
DeleteWow. So cool. Love your glaze technique and the spots.
ReplyDeleteSuch a beautiful layout, Anna-Karin. Love the awesome colors and the precious photo :)
ReplyDeleteWhat a wonderful page you made with these fun new stamps - love the techniques you used on them Anna Karin! Julia xx
ReplyDeleteGorgeous layout! The micro glaze technique looks super and I love the stencil textured background. I loved the sneak peak on instagram and wasn't disappointed. Thanks for sharing. :)
ReplyDeleteOh my gosh! I love this!!
ReplyDeleteOoohhh - micro glaze. This is my first time seeing it and I love the possibilities. Your coloring is beautiful and I will be trying those combinations soon. I love how you added the browns to the background of each image.
ReplyDeleteI love the water color colors, they are all beautiful
ReplyDeleteAdorable!
ReplyDeleteA sweet tribute to your happiness!
ReplyDeleteI love what you did with this project! How amazing to see so many of the images combined in such a clever and heartfelt way. And as always, I am such a fan of your mastery over techniques!
ReplyDeleteLove this layout and all the techniques you used!! Love your use of the glaze!!
ReplyDeleteWow! Great layout, I picked up some wonderful ideas and tips! Thanks for the inspiration.
ReplyDeleteWonderful layout! Thanks for sharing some new techniques!
ReplyDeleteWonderful layout! Thanks for sharing some new techniques!
ReplyDeleteVery cool layout! I have never used blue print stamps but they look pretty awesome. Your attention to detail is incredible. Thanks for sharing!
ReplyDeleteAbsolutely amazing. LOVE your style!
ReplyDeleteBeautiful layout. Love your tutorial.
ReplyDeleteFABULOUS stamps!!!
ReplyDeleteAWESOME inking and layout, LOVE the textures too!!!
THANK YOU for sharing :)
I like all the ways you show this stamp set.
ReplyDeleteWhat a beautiful layout!!! Love all of the texture and color you added to the background!
ReplyDeletebeautiful - love the technique and what a great layout thanks for sharing
ReplyDeleteBarb Housner
wow wow wow.
ReplyDeleteLOVE your layout...can't wait for my stamps to arrive! Thanks for the gorgeous inspiration!
Beautiful scrapbook page.
ReplyDeleteWOW!!! Amazing resist technique and fabulous color combo. I love the page you've created with these stamps.
ReplyDeleteBeautiful page!
ReplyDeleteVery pretty!
ReplyDeleteFantastic work! TFS! The in-depth tutorial and close ups are amazing! I’m loving these Stamptember posts but it’s making it hard to choose which sets to buy! Ugh! I want them allllllllll!!! LOL
ReplyDeleteLa-Vie B.
Follow me at C’est La-Vie Designs Unlimited, LLC
Your tutorial is the perfect example of why vendors should have designers. I saw the stamps then thought nice but how would I use them? Now I can think of many ways and thanks so much. That micro glaze is a perfect partner to distress inks.
ReplyDeleteExcellent work showcasing the stamps and products!
ReplyDeleteJust beautiful and such gorgeous colors!!!
ReplyDeleteWOW... Amazing layout! Love your tutorial! Thank you.
ReplyDeleteWow! Trying to find the correct adjectives on what a spectacular layout this is! Thanks for sharing!
ReplyDeleteGreat techniques, wonderful page. Love that micro glaze.
ReplyDeleteCompletely gorgeous work with the inks and the Micro Glaze resist. I absolutely love the bubbly background too - stunning work as always, Anna-Karin.
ReplyDeleteAlison xx
What a perfectly beautiful layout with all his stamps...awesome!!
ReplyDeleteA wonderful layout Anna and a great use of so many of these new products!
ReplyDeleteLove how you used them on a layout instead of a card! Your double resist technique looks great too, I haven't quite gotten my micro glaze technique down yet but I look forward to trying this!
ReplyDeleteAnna -KArin I love this layout, is so sweet and beautiful! thanks for tutorial to use micro glaze! It's so interesting! I'll try ! New stamps are perfect ! Wonderful work and baby Leo is so cute! You are beautiful together! BArbarayaya
ReplyDeleteWOW...wow...wow! What an awesome page...love how you have used the blueprint stamps...brilliant!!!
ReplyDeleteVery nice all the different things that you did to those stamped images and the background!
ReplyDeleteLoved this tutorial....thanks so much for sharing...so many ideas...you have a new subscriber...happily crafting..
ReplyDeleteAnna, this is amazing!! I am in love with this layout, and your baby will treasure it one day!!
ReplyDelete