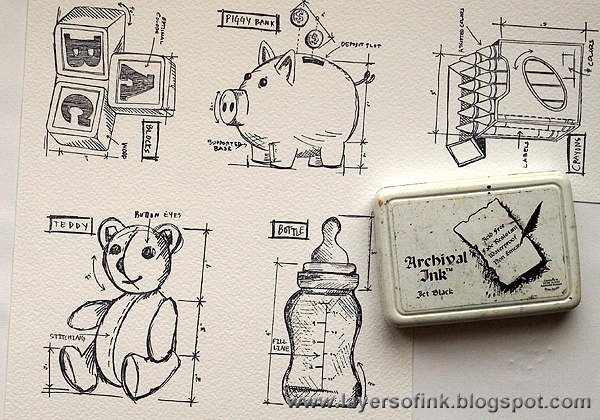
Hi friends! Today I have a little
Sizzix tutorial to share with you. I needed to make a bunch of thank you cards and used
Tim Holtz new
baby blueprint stamps.
The blueprint images are such fun to watercolour and make for quick cards. I got the idea of using them together with the
Postage Dots Thinlits dies, and was real happy with the result. The dies cut a square or a rectangle and make dotted impressions in the paper. This tutorial would work with any of the blueprint stamp sets, and with quite a lot of other stamps too.
Start by stamping blueprint images on watercolour paper with Jet Black ink. It is important to use a waterproof ink since we are going to use water. I used all the eight stamps from the
Baby Blueprint and
Childhood Blueprint sets.
Die cut the images with the
Postage Dots dies, use the rectangular die for the taller images and the square one for the rest. These dies work great together with the
Sizzix Magnetic Platform. Use this sandwich: Magnetic Platform, Cutting Pad, paper, die facing down, second Cutting Pad.
Here you can see the result. The dotted lines are really cool, and since the die also cuts the square or rectangle, you save time.
I looked at my Distress Inks and decided to use this fun colour combo: Mermaid Lagoon, Cracked Pistachio and Shabby Shutters. Smear them on your craft sheet, add a mist of water to each one and pick up with a paint brush. By varying the amount of water you use, you can get lots of different shades from each ink.
Colour the image, drop darker shades into lighter areas while the ink is still wet.
Continue with all the other images. Leave some areas the white of the paper.
Use the same technique and colour the area around the images with Iced Spruce, also using a dark shade of the ink as a shadow.
When the ink is dry, use an ink blending tool and ink the edges with Black Soot.
I also splattered the images with a bit of Black Soot ink. Smear ink on your craft sheet, mist with water and pick up with a paint brush. Tap the handle of the brush to create splatters.
I die cut sentiments from black cardstock with the
Handwritten Love set. This word spells 'lifetime' but I simply cut away the 'time' part.
The ink pools in the debossed dots and gets darker there, while if you look at the dots in the upper right hand corner, you can see that they are lighter where I inked on top with an ink blending tool, since the ink doesn't get into the holes.
The blueprint images were matted on white and black cardstock, or on leftover Core'dinations cardstock.
This was the only image where the descriptive word on the stamp didn't fit inside the die cut square, otherwise the
dies and the stamps worked very well together.
I love this piggy bank stamp, so cute, and perfect for watercolouring.
This was the only image where I used a few more colours, otherwise I stuck to the colours I had picked out, which also speeds up the process.
I very rarely make more than one card of exactly the same design, but this way, they are all different, but still quick to make.
And finally the sweet vintage stroller. These blueprint stamps are so well done and all the images are wonderful.
Thank you so much for visiting today! I will have another post for you tomorrow.
Happy stamping!
Anna-Karin
Supplies:


Love then Anna Karin! Fabulous cards!
ReplyDeleteThose cards are just beautiful.
ReplyDeletegreat card and thank you for the tutorial!
ReplyDeletefabulous...thanks for another great tutorial...hugs kath xxx
ReplyDeleteThese are so incredible looking and your technique and style are fabulous!!
ReplyDeleteI love these, perfect for baby thank you cards. I am glad you used that postage stamp die, I have been wondering about it. Your shading and shadows with the inks is incredible.
ReplyDeletethese are fabulous Anna Karin and those baby blueprints are a real must - friends do seem to keep having babies!!!! Big hugs Rachel xx
ReplyDeleteOh my - these look better than professional Anna-Karin. I just LOVE these. I wish I had some young mothers around these days - these would be so fun to do. You are just so talented. Thanks bunches for sharing this tutorial and your beautiful creations. j
ReplyDeleteYou make beautiful cards! :)
ReplyDeleteOh wow Anna-Karin, your cards are gorgeous - and so is your colouring! I love the look of the postage stamp markings (still waiting for my die... sigh), they add such an interesting dimension to the blueprint images! Hugs, Anne xx
ReplyDeleteThese are so pretty Anna-Karin!
ReplyDelete