Hi everyone! Time for a
Sizzix step-by-step tutorial. I woke up on Monday morning with an idea in my head; a mini version of a December Daily album. I love Ali Edward's idea of a
December Daily, but I don't print my photos at home so it isn't practical for me to do a page with photos every day. Instead, I created a little album where I can write a little bit of journaling every day, and add some photos and bits and pieces later, and not necessarily from each day.
You could easily adapt this little album to work for any topic, use it to record a month of the year, as a little travel, document favourite books, holiday traditions, funny things kids say, or anything you could think of. I wanted to make something quickly, but with a lot of pages and space for extra bits and pieces. As my base I used
Tim Holtz's Ornamental die and I just had to use the new pretty
Christmas Cardinal for the front.
Here's how I made this:
I wanted to make a lot of pages quickly, and one of my favourite ways for that is to use Distress Stains. Smear distress stains on your craft sheet - I used Antique Linen, Frayed Burlap, Tumbled Glass, Broken China and Brushed Pewter. The Brushed Pewter gives a lovely metallic shine to the project.
I used Ranger's manila cardstock for the pages, it handles water very well, is smooth so easy to stamp and write on, and heavy weight. I cut 12x12 papers into two pieces, which is a bit easier to handle, but you can do the whole sheet at once too. Mist the paper on the front and back, quite heavily. The water helps blend the stains. Dip into distress stains and move around just a little bit. Then do the same with the other side of the paper. The side that you coloured first will have stronger colours, while the colours on the other side will be lighter and more blended. Put aside to dry, or dry with a heat gun.
When dry, die cut as many pages as you need using the Ornamental die. You get six pages out of every 12 inch sheet of cardstock. I cut 26 pages, since I wanted to document Christmas until Boxing Day.
I wanted to number the pages, and the
Cargo Stencil Numbers are perfect for that. Since they are movers & shapers dies you can easily place them where you want the number.
Turn the paper and die around and place on your base tray, then die cut.
Do the same with all the other pages, alternating the place of the numbers, so that there is always cardstock behind each die cut number.
To create a space for the journaling, I stamped a Tim Holtz Stamper's Anonymous ledger stamp with Archival Ink Vermillion on the front of every page. Don't aim for perfect impressions. I left the back blank, and will use it either for a little photo or as a place for additional journaling.
Ink the edges of all the pages, back and front with Gathered Twigs.
I used small Christmas stamps and stamped one on each page, with Gathered Twigs and Broken China Distress Ink; a quick way of decorating the album without adding bulk.
Most of the stamps are from Stamper's Anonymous Tim Holtz, I loved that the new small blueprints stamps fit so well. The sentiment on day 12 is from Hero Arts.
The Distress Stain make each page look different from the others, but still coordinating.
I picked stamps specifically for some of the days, like the 24th, when Santa comes knocking on the door in Swedish homes.
The last two pages.
On the back of all the pages, I stamped the Flourish with Tumbled Glass. Its a big stamp and you can get a lot of different impressions by moving it around.
Now the inside pages are ready, so let's turn to the covers. I like the look and feel of canvas on a mini-album, so I glued natural sticky back canvas to one side of two pieces of
mat board. Although the canvas is self-adhesive, I used multi-medium as an adhesive, to make sure it would stick down well. On the other side (the inside of the cover), I glued a piece of kraft resist paper.
Let the adhesive dry and then die cut the covers using the Ornamental die.
Ink the canvas around the edges with Broken China.
Then ink with Brushed Pewter, just around the edge.
It gives a nice metallic shine to the edges, you can see it better on this photo.
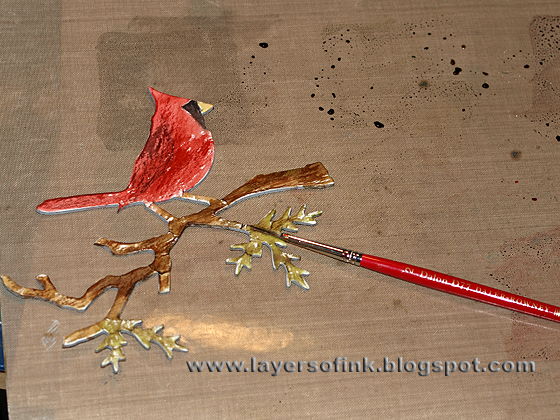
Glue watercolour paper to grungeboard using multi-medium, wait until it is dry, and then die cut the Cardinal from it. I wanted to do watercolour techniques on the Cardinal and watercolour paper works very well for that, but I also wanted it to be sturdy, which is why it was glued to grungeboard first.
Smear Distress Inks on your craft sheet and mist lightly with water (the more water, the lighter the colour). I often mist each ink just a bit on the side, so I have one area which is more watery and one area where the ink is concentrated. Colour the bird and branch, leave some areas the white of the paper, for highlights. I used Festive Berries and Fired Brick for the red, Spiced Marmalade for the beak, Black Soot for the black on the face, Gathered Twigs and Walnut Stain for the branch and Peeled Paint and Walnut Stain for the leaves.
Leave to dry, or dry with a heat gun. It is important that the paper is completely dry before adding more colour, otherwise you get run backs (cauliflowers). This time use more concentrated ink and a fairly dry brush. With the side of your brush just touching the paper, add texture to the bird and branch. I also painted a rough outline of a wing.
Apply a little bit of Glossy Accents at the top of the branches and at the top of the bird and sprinkle dry Rock Candy glitter on top, for a snowy and glittery feeling.
I wanted to be able to add more photos or little bits and pieces later and decided to cut three
pocket envelopes from kraft resist paper. Position the paper strategically so that you can pick which parts will show on the envelope.
Swipe Brushed Pewter across the paper, not covering completely. This gives a great shine, without covering up the images, as you can see on the photo, where the light hits the paper, you see the silver, where it is darker, you see the images clearly.
Add reinforcers with brads and tie a string around the top one, twisting it around the bottom one to close the envelopes.
Time for assembly. Punch holes through the covers, envelopes and all the pages, making sure all the holes are in the same place. I stamped a sentiment on a
Tattered Banner, die cut from left-over manila cardstock, a December calender stamp on another piece and the year directly on the cover.
Bind with large rings, which also makes it easy to add things later on.
I placed the envelopes here and there.
I know I will add additional photos on Christmas Eve, so the nicest of the envelopes is placed there.
Done! The album has a really nice chunky feeling to it. Time to catch up on the journaling for the first days of the month. The small format makes keeping this journal very stress free. I have a tendency to write a lot, and then it also takes long, now I'll just jot down the most important things that happened each day.
Thanks so much for visiting!
Happy Christmas crafting!
Anna-Karin
Supplies:
Dies: Sizzix:
Ornamental Bigz,
Cargo Stencil Number Set movers & shapers,
Christmas Cardinal Bigz,
Pocket Envelope,
Tattered Banners Sizzlits
Stamps: Stamper's Anonymous Tim Holtz: Flourish, Mini Blueprints, Mini Holidays, Mini Holidays 2, Mini Holidays 4, Christmas Time, Grunge Snowflakes, Classics #9; Hero Arts: Let it Snow CL233, Greatest Gift CL559, Sending Holiday Cheer CL464, Holiday Sayings CL343, Spirit of the Season CG375
Surfaces:
Sizzix Little Sizzles mat board white; Ranger manila cardstock, Claudine Hellmuth natural sticky back canvas; Tim Holtz Idea-ology Christmas Kraft Resist paper; Daler & Rowney watercolour paper
Ink: Distress Ink: Tumbled Glass, Broken China, Gathered Twigs, Peeled Paint, Walnut Stain, Black Soot, Festive Berries, Fired Brick, Spiced Marmalade; Ranger Archival Ink Jet Black, Vermillion
Stain: Distress Stain: Antique Linen, Frayed Burlap, Tumbled Glass, Broken China, Brushed Pewter
Glitter: Ranger Distress Stickles Rock Candy dry glitter
Embellishments: Tim Holtz Idea-ology Seasonal Chit Chat stickers
Adhesive: Ranger Glossy Accents, Claudine Hellmuth matte multi medium


Cool mini Anna-Karin! Love the colors and how you got them. Such a nice idea for the book!
ReplyDeleteLovely mini book Anna-Karin, love the little pockets and the bird. Lovely background stamping too. Tracy x x
ReplyDeleteFabulous! Beautiful mini book!
ReplyDeleteCompletely stunning, and another amazingly detailed tutorial - thank you so much Anna-Karin! Such beautiful colours... I'm going to surrender to that pocket die any minute now, I can feel it!!
ReplyDeleteAlison x
Gorgeous mini book! Thanks for sharing the details!
ReplyDeletewow such an amazing book :)
ReplyDeleteamazing done!! beautiful.
ReplyDeletegreetings
What a fantastic little keepsake. I really like the colour-smearing background technique - it's so effective and great for a project like this, so that each page is similar but not exactly the same. Thank you for the detailed instructions!
ReplyDeleteThis comment has been removed by the author.
ReplyDeleteI absolutely adore the numbers cut out of every page. You have the best ideas and the most amazing style, Anna-Karin! Wow!
ReplyDeleteWhat a fabulous keepsake this will be! A fantastic tutoral Anna-Karin!
ReplyDeleteLove your use of colors! Seeing the brown page edges from the front view is great. Terrific envelopes for later add-ins. Thanks for sharing!
totally love the mini and the tute. mahalo for sharing.
ReplyDeleteSuper idée j adore ....
ReplyDelete